Sequencer Introduction #
Contents #
- Setup
- Sequencer Interface Overview
- Sequence Info
- Sequence Audio
- Sequencer Navigation
- Sequencer Tracks
- Inspiration
Setup #
The Sequencer requires the Bridge to be connected, and it is recommended that devices be connected for real time playback of effects.
View the Pixo App getting started guide for more information.
Open the Sequencer by clicking the "Sequencer" button in the App header.
On the Sequencer page, click "File", then "New" to create a new empty sequence.
Sequencer Interface Overview #
This section highlights the main controls and an outline of their function.
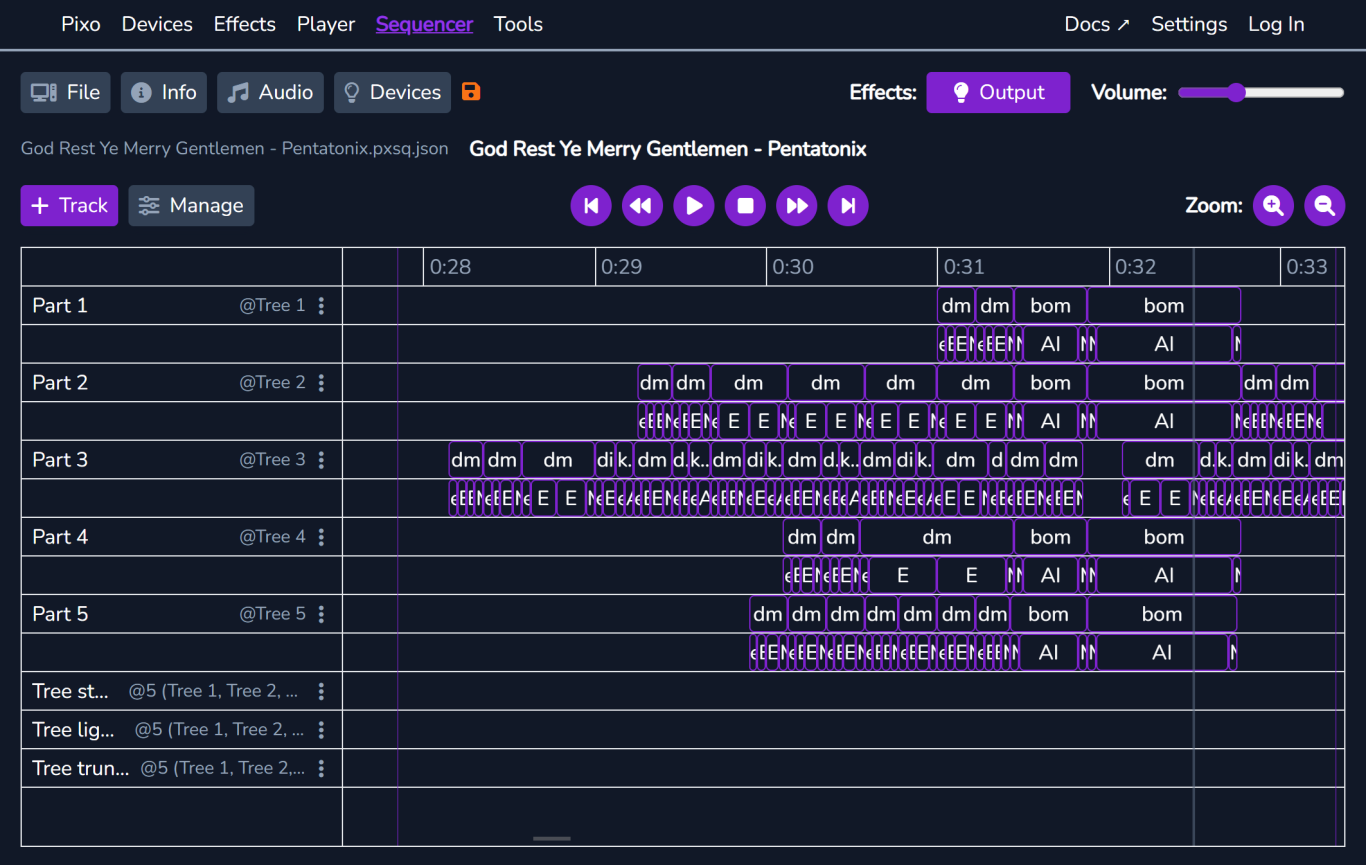
Sequencer page in the Pixo App
Menu Bar
- File - create new sequences, save/load/import/export sequences
- Info - edit sequence title, description, etc.
- Audio - select sequence audio
- Devices - map sequence tracks to connected devices
Output Toggle and Audio Volume
- Enable/disable outout of lighting effects to connected devices
- Adjust the volume of the sequence audio, if the sequence has audio
Current Sequence Information
- Information about the current sequence, including the name of the file on the local system, if applicable.
Create/Manage Tracks
- Create a new empty track, or import lyric information from an .xtiming file
- Reorder tracks and change track visibility
Playback Controls
- Skip backward - move the playback position to the cursor, or the start of the sequence
- Seek backward - move the playback position backwards 5 seconds
- Play/Pause - start playing the sequence, or pause if playing
- Stop - stop playback, and move the playback position to the cursoe
- Seek forward - move the playback position forwards 5 seconds
- Skip forward - move the playback position to the end cursor, or the end of the sequence
Zoom Controls
- Zoom in and out of the sequencer panel horizontally, i.e. make one second in the sequencer wider or narrower
Sequencer Panel #
- The main section of the Sequencer, containing the following components:
Track Row Headers
- Display track titles, the names of targetted devices, and certain status indicators
Timing Ticks Track
- Timing ticks displaying the current position in time within the sequence
Sequencer Tracks
- Timing Tracks - add beats at certain times as snapping points for other tracks
- Singing Tracks - add lyrics, and automatically extract the mouth shapes to display on devices with "faces"
- Effect Tracks - add timed lighting effects to display on devices or device submodels
Sequence Info #
Click the "Info" button in the menu bar to open the dialog to edit the sequence information. You may use the fields for any information you like.
- Title - the main title of the sequence - it is recommended to complete this field
- Description - a longer description of the sequence
- Author - the creator of the sequence
- Link - a URL of a related or referenced resource
- Notes - any additional notes
Sequence Audio #
The Sequencer is mainly used to create animated lighting effects in time to music or other audio. Most sequences have audio, but it is not required.
Click the "Audio" button in the menu bar to open the dialog to edit the sequence audio.
The Sequence Duration can be specified here. If audio is correctly specified, a warning will be displayed if the sequence duration and audio duration do not match.
One of four types of sequence audio can be selected.
No Audio #
- Select this option for no audio, the sequence will still play but will be silent
- This can be useful for scheduled background animations
Bridge #
- Select an audio file in the Bridge's Assets Folder (see Bridge Settings for more information regarding the Bridge Assets Folder)
- The specified audio file path must be a path within the Bridge Assets Folder
- If the specified audio file loads correctly, it can be previewed in the player in the dialog
- For example, if the Assets Folder contains a folder named "Music", containing a file named "jingle-bells.mp3", enter "Music/jingle-bells.mp3" in the input box
URL #
- Enter the URL of any audio file accessible over the internet
- If the specified audio file loads correctly, it can be previewed in the player in the dialog
Spotify #
Coming soon!
You will need a Spotify premium account to play music from Spotify in the Pixo App.
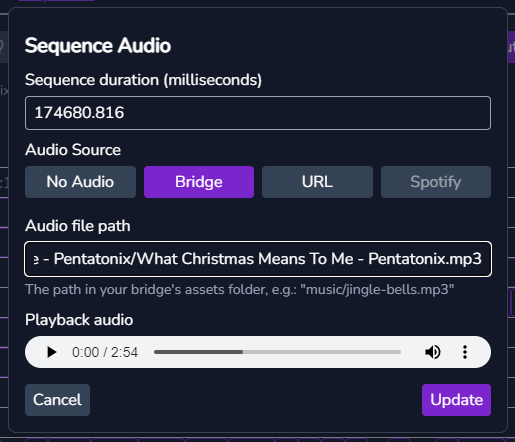
Sequence Audio dialog
Sequencer Navigation #
The sequencer can be navigated using both keyboard and mouse controls.
Playback of the sequence can be stared and stopped using the , , and buttons, or pressing the Spacebar.
Click in the timing ticks track to place the cursor. Playback will then begin at that time in the sequence. An end cursor can also be placed by either clicking and dragging in the timing ticks track, or shift-clicking the timing ticks track. Playback will automatically stop if the playback position reaches the end cursor.
The playback position can be skipped forwards or backwards by 5 seconds by using the LeftArrow and RightArrow keys, or the and buttons.
The view of the sequencer can be panned left and right using the scrollbar at the bottom of the sequence, or using Shift+MouseWheel on the sequencer panel. The zoom level can be adjusted by using the and zoom buttons, or using Ctrl+MouseWheel on the sequencer panel.
Select a node in a sequencer track by clicking on it. The selection can be moved by using the keyboard arrow keys.
Sequencer Tracks #
Sequencer tracks contain the lighting animation instructions for the sequence.
Timing Tracks #
Timing tracks are used as a guide for the other types of track. The beats in timing tracks can be used as snapping targets when editing nodes in other tracks.
To create a timing track, click the " Track" button, then "Timing track".
Double-click in the timing track to create a beat at that position.
Beats can also be added while the sequence is playing. To enable this setting, open the track menu with the button in the track header, then select "Not listening for beats". The icon will appear in the track header to confirm the setting is enabled. While the sequence is playing, press the T key to add a beat at the current playback position.
When timing tracks are enabled, the beats in the track will be used as targets for snapping while editing nodes in other tracks. Disable a timing track from the track menu.
Singing Tracks #
Singing tracks are for timing mouth shapes in time with sequence audio, to control devices that have "faces" like the Mini Tree.
To create a singing track, click the " Track" button, then "Singing track". New singing tracks can also be created by importing an .xtiming file exported from xLights.
Singing tracks contain two rows in the sequencer, the upper row is for lyrics, and the lower row is for phonemes (the mouth shapes used to "say" the associated lyric). Phonemes are created and edited in terms of ther parent lyric node.
Lyric Nodes
Create a new lyric node by double-clicking in the lyric row. Edit the lyric text by double-clicking the node, or selecting "Edit" from the node's right-click menu.
Lyric nodes have a duration, unlike timing beats. Lyric nodes always have a start time, but may not have an end time. If they do not have an end time, they last until the next lyric node in the track. Select "Auto width" from the node menu to remove the end time and enable automatic duration.
Lyric nodes can be moved within their track my dragging them with the mouse. This will update both the start and end times. To move only one end of the node, hover over the node then drag one of the handles that appears at either end of the node. Nodes will "snap" to nodes either side of them for easier positioning.
Nodes ends can also be nudged with the kayboard. With a node selected, press Ctrl+Left/Right Arrow to move the node start, and Alt+Left/Right Arrow to nudge the node end. Hold both Ctrl and Alt to move both ends at once.
The node menu also contains more controls to create, merge, and split lyric nodes.
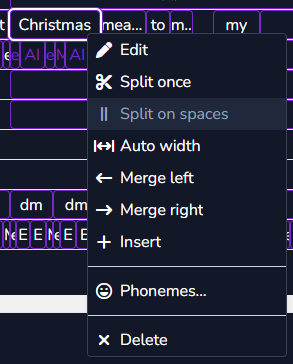
Lyric node menu
Phoneme Nodes
Once a lyric node has lyric text added, then the phonemes constituting that lyric can be created.
The Pixo Bridge contains a dictionary of phoneme information for most common English words (~134,000 entries). To automatically extract the phonemes for a lyric, select "Phonemes" from the lyric node emnu, then "Extract phonemes". The lyric node's text is split into separate words by spaces, and may contain special characters which are ignored. The resulting phonemes replace any existing phonemes.
If a word cannot be found in the Bridge's dictionary, or if you want to tweak the generated phoemes, the phonemes can be manually edited. Select "Phonemes" from the lyric node menu, then "Edit phonemes". The phoneme nodes can then be edited in the dialog. If any changes are made, the phoneme timings will be reset.
Phoneme node timings can be edited like lyric nodes, both my dragging them with the mouse and nudging them with the keyboard.
Phoneme nodes are created with default timings within the lyric node depending on the phoneme. To reset a lyric node's phonemes to this default timing, select "Phonemes" from the lyric node's menu, then "Reset timing".
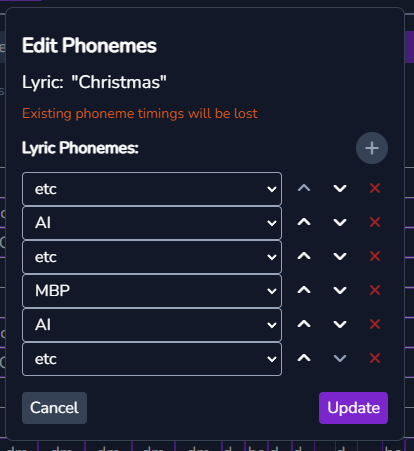
Edit Phonemes dialog
Effect Tracks #
Effect tracks are for setting effects on devices in time to the sequence audio. Effect tracks can also send any Pixo Device command to devices, enabling fine-grained control of devices.
To create an effect track, click the " Track" button, then "Effect track".
Like lyric nodes, effect nodes have a duration, with both start and end times. Effect node timings can be edited like lyric nodes, both dragging with the mouse and nudging with the keyboard.
To edit an effect node's effect, either double-click the node, or select "Edit" from the node's right-click menu. Each effect node can either set an "Effect" on the targeted devices, or send an arbitrary Pixo command.
Effect
Select the "Effect" tab in the "Edit Effect" dialog.
One of the Pixo effects can be selected in the dropdown, and the effect parameters can be customised. This is similar to editing effect settings using the Effects page in the App.
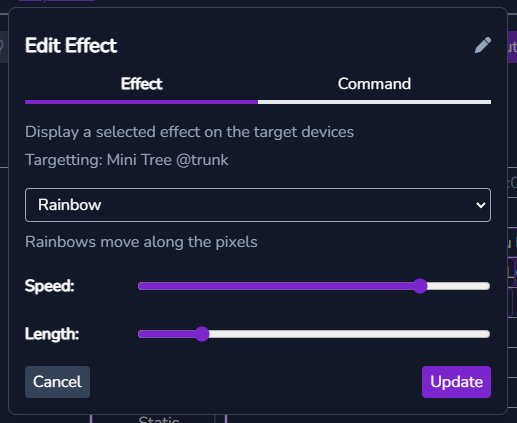
Edit Effect node dialog
Command
Select the "Command" tab in the "Edit Effect" dialog.
Any Pixo device command can be entered in the input box. To make it easier to input commands, the input box includes an autocomplete feature. As commands are typed, suggestions are displayed below. Use the UpArrow and DownArrow keys to select one of the autocomplete otions, the Tab to complete the input with the selection.
The structure of the selected command is displayed below the input, along with information about the command's parameters.
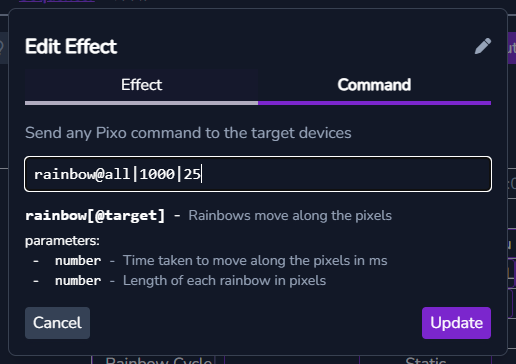
Edit Effect node dialog - edit command
Managing Sequencer Tracks #
Click the button in the track's header to open the track menu. This menu contains common editing controls like enable/disable, duplicate, hide, and delete. Other settings are also available depending on the type of track selected.
Click the "Track settings" button in the track menu to open the Track Settings dialog.
Tracks can also be reordered and hidden/unhidden using the Manage Tracks dialog. Click the " Manage" button next to the " Track" button to open the dialog.
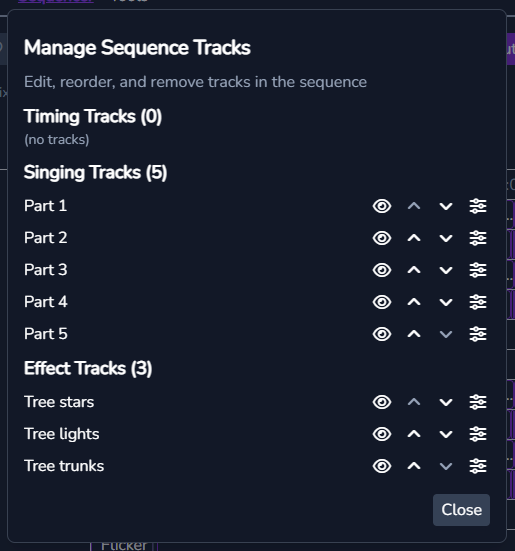
Manage Tracks dialog
Track Output Devices #
In order to display effects on connected devices, singing tracks and effect tracks must be told which devices they should control.
Devices are connected using their Name (device names can be edited in their settings page). This allows you to easily share and import sequences without knowing information like the device serial number, or target multiple devices using the same name at once.
In the "Track Settings" dialog for the selected track, click the button next to "Track Devices". Then either select a connected device to add, or enter the name of a device as text. This allows you to configure target devices without needing to plug all of your devices in.
Multiple tracks can target the same device, however they will overwrite each others effects if they conflict.
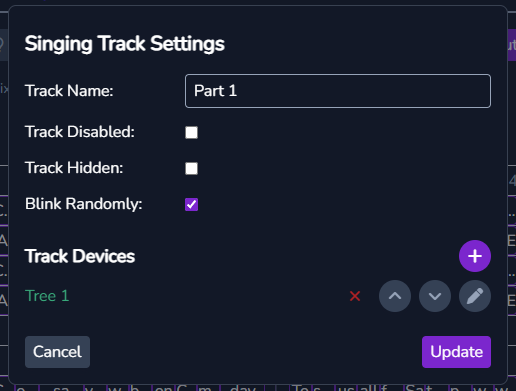
Track Settings dialog
Inspiration #
Check out the Pixo YouTube channel to see some of the sequences we have made!